Tuesday, January 29, 2008

Create Your Own Google Earth Application

Building an application to work with Google Earth is pretty easy to do. This article will walk through the creation of a very simple application to capture different views in Google Earth.

To begin with, you will need to download Microsoft's Visual Studion Express Edition for C# (available for free at http://www.microsoft.com/express/vcsharp/).

Once Visual Studio is installed, select 'New Project' from the 'File' menu. In the New Project dialog box, select 'Windows Forms Application' and name your application 'FirstGeApp' (see below). Then select OK.


Once the new form is visible, right click on it and select 'Properties'. A properties window should appear in the lower right hand corner of Visual Studio. Change the following Form properties:

Name = frmViewCapture


Text = View Capture


TopMost = True


The TopMost property will keep your form on top of all other applications. This works well when interacting with Google Earth.


Once you have set the Form properties, we will add a MenuStrip control to the form, to do this, click on the Toolbox on the left side of the Visual Studio. When the tools appear, click on the pushpin icon to keep the tools open (see above).


After this, look for the 'MenuStrip' control and drag it onto your form.


Once the MenuStrip is on your Form, click on it to enter text. In the example below, I have added a 'File' menu and a "Capture View" menu. You can keep the default setting for both of these.


Next, we are going to add a TreeView control to store our captured views. Find TreeView from the Toobox pallete and drag it onto the form. Once you have done so, change the 'Dock' property of the TreeView to "Fill" (see bel0w). This will make the TreeView take up our whole Form.


Next, add an ImageList control. You can drag this control onto the Form, or drag it to the bottom part of Visual Studio (see below).


After you have added the ImageList, right click on and select 'Choose images' (see above). In the next dialog box, select "Add". Navigate to an icon of your choice (I used
C:\Program Files\Google\Google Earth\GoogleEarth.ico).

Once you have added the image, click on the TreeView in the form and look in the Properties on the right. Set the following properties:

ImageList = imageList1
ImageIndex = 0

Next, you will need to add a reference to Google Earth. To do so, look for 'References' in the Solution Explorer in the upper right hand panel of Visual Studio. Right click References and select "Add Reference". In the dialog box that comes up, select the 'Browse' tab. Browse to
C:\Program Files\Google\Google Earth\googleearth.dll (depending on your installation) and add it as a reference.

Next, click on Form1 in the Solution Explorer and select Code View (see below).


Now we are going to add some code. You will see code similar to below. Add the underlined code to project.


using System;
using System.Collections.Generic;
using System.ComponentModel;
using System.Data;
using System.Drawing;
using System.Linq;
using System.Text;
using System.Windows.Forms;


namespace FirstGeApp
{
public partial class frmViewCapture : Form
{
//Add a reference to the Google Earth Library
private EARTHLib.ApplicationGEClass _ge = new EARTHLib.ApplicationGEClass();
//Make an integer to keep track of our Google Earth Views
private int _viewNum = 0;


public frmViewCapture()
{
InitializeComponent();
}
}
}


Next, we will nee an event handler to capture the view. The simplest way to do this is to go back to your form and double-click "Capture View" on the menu that you added to your form. Visual Studio will automatically add the code below to handle the click event for this menu item.


private void captureViewToolStripMenuItem_Click(object sender, EventArgs e)
{

}


Next, we will add some code to actually handle this event. Write the following method underneath the captureViewToolStripMenuItem_Click method.


private void captureGeView()
{
//Get the current Google Earth Camera
EARTHLib.CameraInfoGE cam = _ge.GetCamera(1);
//Increment the number of views
_viewNum++;
//Create a Node for the tree view
TreeNode node = new TreeNode("View " + _viewNum.ToString());
//Add a reference the the GE Camera to the node
node.Tag = cam;
//Add the node to the tree view
this.treeView1.Nodes.Add(node);
}


Now, add "captureGeView();" to the captureViewToolStripMenuItem_Click method.


The next step is to add code to actually move Google Earth to each of the capture views. Go back to the Form and click on the TreeView control (treeView1). On top of the properties box, you will see an icon that looks like a bolt of lightening. Select this to see events for the TreeView. Double Click on MouseDown to automatically add a handler (see below).


This will add a "treeView1MouseDown" method to your code. Add the following code in this method.


private void treeView1_MouseDown(object sender, MouseEventArgs e)
{
//Get the clicked node
TreeNode node = this.treeView1.GetNodeAt(new Point(e.X, e.Y));
if (node != null)
{
//Get the cam from the tree view tag reference
EARTHLib.CameraInfoGE camera = (EARTHLib.CameraInfoGE)node.Tag;
//Move the GE View
moveGE(camera);
}
}


And the following


private void moveGE(EARTHLib.CameraInfoGE cam)
{
//Set the Google Earth Camera View

_ge.SetCamera(cam, .5); //Change this number to alter your speed
}


Now Press F5 on your keyboard to run. Google Earth will open with your application. Clicking "Capture View" will add a view to your Tree View. Clicking on a node on your TreeView will move you to that node


Can you name this stadium?


You can take this much farther by adding user input to name each view and alter the speed. Chain them together to creat a tour or export to KML.

Monday, January 28, 2008

Build Your Own Google Earth Control

If anyone is interested in writing your own Google Earth Control that can be embedded in your applicaiton, there is good information on how to do so using C# at Google Groups for KML.

Also, you can see delphi code to do the same thing at googleearthairlines.

Monday, January 21, 2008

Create a Google Earth Toolbar / Form

A third option for integrating customized tools with Google Earth is pretty simple, you just write an application that hovers over Google Earth. It just like a floating tool bar or form that you can use to access your custom applications.

In the sample below, the application is sized to look like an extension to the Google Earth toolbar. It keeps track of the location of Google Earth so that it can stay in the same location. Different applications that interact with Google Earth can be launched from this toolbar.

Notice below the extension to the Google Earth Toolbar.


As an example, a custom Spatial Bookmark tool can save the current view of Google Earth for quick reference. Notice below how when this button is clicked on, a drop down menu of options is presented.


After selecting 'Create', a Windows form is launched. This form lets users name the current bookmark and set the zoom-to speed for when it selected.

Any of a number of spatial bookmarks can be save and accessed from the drop-down menu (see below).


The bookmark data itself is saved locally as an XML document. Different XML spatial bookmark documents can be saved and managed (see below).


In addition to saving bookmarks, the view itself can be sent through a web service to other people participating in a shared Google Earth collaboration.

Embed Google Earth Into Your Application

This method for customizing the Google Earth Interface, embedding the Google Earth render window (the actual map window) into your own applications, was apparently pioneered Luca Rocchi and his Google Earth Airlines application. Luca figured out that you could grab the GE map window using its Windows handle to place it into your own application. He has used this to plop GE into web applications, but the ActiveX control that he provides for free can also be used in any COM compliant language (such as VB.Net or C#). I have used this plugin (and a similar one of my own design) to access external applications from Google Earth.

This method lets you completely encapsulate Google Earth with your own tools. However, it also hides the Google Earth tools. To get around this, you can assign the entire Google Earth application to be a child to your own custom application. Interestingly, not too long after Luca released his 'Google Earth Airlines' plugin, Google provided a method in their API to directly access the Windows Handle of both the render window (actual map) and the application window (the full application).

Custom Google Earth Applications with Network Links

As posted previously, there are five general ways in which to provide custom control to Google Earth.

  1. Use built-in network links and server side scripting to serve custom data dynamically.
  2. Embed the Google Earth render window into your own application.
  3. Build customized applications that always hover over Google Earth.
  4. Use JavaScript in the built in web browser.
  5. Use a Flash application in a pop-up balloon.
Using this first option does not really use the API, nor does it really let you modify the user interface. It uses the very flexible, built-in, KML capabilities that the Google Earth client provides for free.

To use it, you need to have a web server that can respond to a network link request from Google Earth. The request can have a number of client parameters in it, such as the view information. This can be used to generate a return KML document whose content is based on the area that a user is looking at. A network link KML file can be added to Google Earth that sends this request to update the KML document on a time basis, or whenever the user zooms and stops.

This method can get pretty sophisticated. The Regions KML tag allows users to define the visual region of interest for specified data in the KML document. This is a great way to handle very large datasets.

A network-link KML document can be created that defines a number of different, thematic, KML documents, which can be loaded and unloaded every time the user enters a defined region. Brian Flood offers an excellent example of how this can be applied to large geospatial data sets using Arc2Earth.

Customizing the Google Earth Interface

Ever since people became aware that it was possible to allow external software applications to interact with Google Earth using their API (which seems to be in perpetual beta stage), they have been trying to figure out how best to integrate their custom applications into Google Earth.

While almost all of the initial efforts dealt with taking existing applications and simply loading their data into GE in a KML format, later efforts involved trying to make all functionality directly accessible form the Google Earth application itself.

The basic problem, however, is that Google Earth does not provide a framework to extend its user interface. You cannot simply add a new button to their toolbar that fires off your own application, as you can in many GIS and Office software packages.

A couple of tricks have been developed to make Google Earth application extensions appear to work seamlessly with Google Earth. They generally fall into five categories.

  1. Use built-in network links and server side scripting to serve custom data dynamically.
  2. Embed the Google Earth render window into your own application.
  3. Build customized applications that always hover over Google Earth.
  4. Use JavaScript in the built in web browser.
  5. Use a Flash application in a pop-up balloon.

Has anyone come up with their own way get their application to work with Google Earth?

Thursday, January 10, 2008

Publish Your Own Google Map Without a Server

If you would like to publish your own Google Map, but do not have a server to place it on, there are some greate options to get you started without needing a server.

I ran across this web page recently that has a number of excellent tutorials for using Google's Page Creator. The Google Pages site is fantastic for putting together really quick and easy web pages. It also will let's you publish your own Google Maps Web Page using the this tutorial.

I used this tutorial to put together my own sample Google Map. This is pretty basic, but could be spiced up quite a bit with added funtionality.

Saturday, January 05, 2008

Creating Hybrid Spatial Solutions: Commercial and Open Source

Open source geospatial systems and tools have really taken off in recent years, as has the open source community at large. While an open source geospatial solution may be enticing to some GIS managers, there remain a number of hurdles for them to be effectively employed.

Chief among these hurdles are the lack of documentation, training, and the added difficulties of configuring or extending open source solutions (it’s tough to get a good ArcSDE administrator, it’s tougher still to get a good PostGIS administrator). In addition to this, while open source is starting to provide a rather comprehensive suite of software that includes desktop and web based GIS tools and services, as well as database storage and support, they still tend to lack a good data management framework. I suspect that the reason for this is because developers of open source spatial software want their work to be able to do something relatively fast. So they tend to make them work on existing GIS data (such as shapefiles) rather then put a heavy emphasis on creating and managing spatial data from scratch.

Most GIS may be reluctant to move too quickly towards an open source solution when they already have a functionally proprietary system in place. Even though moving towards open source may be compelling due to the potential cost savings in licensing fees, those savings are offset by concerns over being able to manage the system and maintain current capabilities.

The most likely scenario in the near future is to start seeing the appearance of hybrid solutions.

As an example, a GIS shop may decide that their use of ArcEditor (or ArcInfo), ArcSDE and ArcIMS (or ArcServer) may be overkill for their specific requirements. While this software provides an enormous amount of capability, this may not actually be required. It may be possible for them to effectively manage their spatial data using an ArcMap license to manage the spatial data, and then have that data pushed into a PostGIS database for corporate or enterprise attribute editing and visualization. The key is to leverage the power of both commercial and open source solutions towards cheaper and oftentimes more powerful solution.

Thursday, October 04, 2007

SDSFIE Data Dictionaries for Trimble GPS

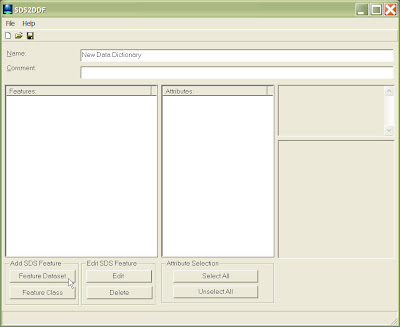
The Spatial Data Standards for Facilities, Infrastructure, and Environment (SDSFIE) provides a template for creating standardized geospatial standard for storing data. There are tools that can be used to automatically create SDSFIE Geodatabases (as well as other formats), but there have been no tools that could automatically generate SDSFIE compliant Data Dictionaries to be used for data collection by Trimble GPS units. The SDS2DDF application was designed to do just that.

The SDS2DDF is a VB 6 application that creates an ascii file that can be imported into Trimbles Data Dictionary Editor, and then into their GeoExplorer (and other) GPS receivers for field collection.


The above graphic shows the SDS2DDF as soon as it has been opened. Users can select to navigate through SDSFIE Feature Classes either by class, or grouped by Feature Dataset. The browser below shows the browse by Feature Dataset option. Users can also conduct a search by keyword to find a Feature Class that best meets there needs.


The user above has selected three Feature Classes. After selecting OK, the Feature Classes are loaded into the Main application screen (below).

Users can then browse through all of the loaded attributes for each Feature Class and determine which ones they would like to export to the final data dictionary. They can also view the description and domain values (if present) for each attribute field.
Users can also change certian properties for each feature, such as the alias name to be used (below).

Users can also change certain aspects on how the data is collected by the GPS receiver.


Once complete, the file is saved as an ASCII file (below).
To get the data into Trimble's Data Dictionary Editor, the user just selects 'Import ASCII file" from the 'File' menu.

The data can then be modified and saved as a DDF file for use in a Trimble GPS receiver.


Wednesday, September 05, 2007

Microsoft Photosynth Promises a Truly Immersive Experience

Microsoft's Photosynth


Photosynth is a remarkable product that is being developed by Microsoft in their Live Labs. It can merge hundreds of photos from many different angles to create a truly incredible, fluid, visual experience. I found its navigation to be extremely easy and flexible.

I can only imagine what capabilities this might provide if they merge it with Virtual Earth. This may provide a truly immersive experience at many different scales. Users could zoom from the macro to micro in an instance. It appears to be able to server an enormous amount of data very quickly.

It looks like Photosynth is part of a larger effort to change how we can visually interact with our limited monitors (check out Seadragon). This promises to deliver some very exciting results in the not to distant future for the geo-community.
You can download Photosynthes from the Live Lab website. There are also a couple of good videos to watch at the Live Lab site, and on at TED.


Flight Simulator Built into Google Earth 4.2

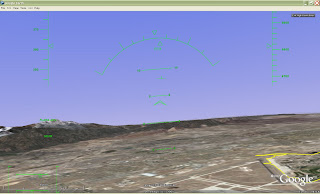
A friend pointed out to me today that there is a hidden feature in the new Google Earth 4.2 release. If you click on the Earth and hit ctrl+alt+a, you will get a dialog box for a flight simulation mode in Google Earth flying either an F-16 or an SR22 aircraft. You can also select to start from an airfield, or from your current point of view. A heads-up display appears as soon as you get into the flight mode.

After you have entered this mode for the first time, you will be able to access it from the Tools menu in Google Earth.

I do not have a joystick on my computer, and the control seem to be a bit touchy, but this is very interesting as a hidden feature. Keep your fingers crossed that they keep working on this and turn it into something useful.


Click Ctrl + Alt + A after clicking on the globe to activate. Once activated, Enter Flight Mode is available from the Google Earth Tools menu


Fly around with a Heads up Display.


Sunday, August 19, 2007

GIS and KML

When Google released Google Earth as a free download several years ago, people quickly learned what Keyhole Markup Language (KML). GIS professionals were quick to build translators to convert their data from several different formats into KML for viewing in Google Earth. The better of these tools let the user maintain the mapping symbology from their GIS software platform into the KML.

In the last couple of years, and enormous amount of geospatial data has been converted to KML to be viewed in Google Earth. In response, may geospatial visualization packages started to let users load KML into their own viewers. So where does KML actually fit into the whole geospatial realm? Will it become a standardized way to store geospatial data?

KML has a couple of things going for it. It’s based on XML and is well documented. It represents a pretty good method for encoding spatial data and symbology (and, to a lesser extent, attribution). But by far the biggest thing KML has going for it is that it is native to Google Earth. To that end, KML is really oriented toward defining displayable geospatial data. I have yet to see any code that performs any geosprocessing on KML, and there is a lot of overhead with KML then with, as an example, a shapefile.

So where does KML fit in compared to GIS data? I think that the answer to that lies with what people with a GIS background typically do with KML. They dynamically generate it from traditional geospatial data stores (shapefiles, geodatabases, etc), and they allow their own viewers to load and see KML files.

KML is serving the role that is usually found within GIS software. Whenever a file is loaded, a symbology class is assigned to it to define how the data will look in the map. Most people, other than programmers, never actually see this information. They only see the windows that let them alter the symbology of data, and the data itself. Some GIS packages allow users to save “layer” information that references the originating spatial data (an ESRI ‘.lyr’ file is an example).

So, in conclusion, it appears that KML represents what is typically in in-memory representation of geospatial and symbology data in most geospatial software applications, offering KML authors a very unique, open, specification at that level of representation.

Targeted Solutions with ArcGIS Explorer

ArcGIS Explorer is described by ESRI as being a “lightweight client for ArcServer”. Interestingly, ArcGIS Explorer is not actually tied to any other ESRI products. It and an SDK to develop customized tasks are free to download, and (as far as I can tell) free to deploy.

What this means is that ArcGIS Explorer can be used as an interface for all sorts of geospatial applications in a manner similar to Google Earth, Virtual Earth, and WorldWind using free and open source geospatial software components. Any processing logic that can be connected to any of these earth browsers can similarly be connected to ArcGIS Explorer. The current strength of ArcGIS Explorer in this category is the ability to customize the interface to hold any new toolsets.

I am really hoping to be able to work on some targeted geospatial applications that can very cheaply take advantage to this visualization platform.

Tuesday, January 09, 2007

Google Earth as a Geographic Information System

The first work that I did with Google Earth and KML was to build a converter in ArcMap that would export all of the selected layers out to KML. We used this for an emergency response tool set that worked in ArcMap. The idea was that the mapping would be managed by someone trained in using GIS who would them automatically kick-out KML updates to a server to be viewed using GE networklinks by commanders.

This worked really well, but at the time, I wondered if it would be possible for Google Earth to act more as an interactive partner rather than a static viewer. When it came to having GIS capabilities, Google Earth has never really been considered (for good reason).

However, the more I thought about it, the more I wondered if GIS type functions used for command and control applications could not be accessed and used by Google Earth. What I really wanted to do was to used open-source functions with not license restrictions to create a GIS back end, and then have Google Earth act as the interface.

When Google Earth officially announced that they had a COM API, I started looking a bit more at the possibility of being able to interact more effectively with Google Earth. I noticed some update functions that I thought might help . I first mentioned this in the beginning of December when I wrote New Google Earth API Allows for GIS Type Interaction.

I was able to use this new API function to select coordinates directly from Google Earth. This has huge implications, as I can use these coordinates to Select and Identify GIS data. I can now marry this capability with Shape2Earth, which allows me to Import GIS directly into Google Earth.

So, now I can load GIS data directly into Google Earth, and I can query and select this data using Google Earth. The next thing I want to do is actually create data and launch geoprocessing functions from Google Earth. Here is how I do that.

To start with, I have the Google Earth Render window embedded in my application (I'm using GoogleEarthAirlines to do this), and I have loaded GIS data using a modified form of Shape2Earth.


To show how I can interact with Google Earth similar to a GIS, I'll walk through an emergency response scenario. I am given a building at which there is an incident, I can do a quick search using either the building name, ID, or a coordinate. I use MapWindow GIS components to search for the building information in the shapefile, and then zoom to the location.
When I get to the area of interest, I want to Cordon (buffer) off the affected area. I first select my Cordon tool and click on Google Earth to set the center point (I could also select the building and create a cordon around that). The point (or selected feature) is sent to my cordon tool. I then select the size of the cordon, the measurement units (feet, meters, etc.), and the number of rings I would like. In this case, 2000 feet with 1 ring.
MapWindow GIS components are used to create the buffer (shown below). Shape2Earth creates a kml file and a shapefile to represent the new geospatial data set.

The next thing I want to do is determine what buildings are impacted by this event. MapWindow GIS components select the buildings using the cordon polygon. Shape2Earth modifies the color of the kml and reloads is quickly into Google Earth (see below). The same process is used to select affected roads, and to set up traffic control points to isolate the area.
All of these new data are saved as kml with associated shapefiles as described in Importing GIS Data into Google Earth.


Since my GIS data and KML are linked, and I can grab coordinates off of the map, I can change the status of buildings simply by clicking on them in Google Earth (note that the orientation of Google Earth does not matter, not does the location that you click). This brings up a dialog box that lets me edit the GIS data which also changes the color of the KML.

Above, GIS data is selected and edited directly in Google Earth.
Below, the KML file is update and reloaded.


Combining the visualization of Google Earth with the power of GIS leads to some very effective capabilities. The data can be immediately served out to other clients, such as another Google Earth as seen in the graphics below.


GIS Data viewed and edited in Google Earth above

Created GIS data viewed in another Google Earth Client in near real-time


Besides being able to edit GIS attribute data, we can create GIS data by digitizing directly on Google Earth. The graphic above shows a sketched route that is converted to a shapefile.


Importing GIS Data into Google Earth

Google Earth has often been described as a geospatial data browser. The reason for this is simple ... while Google Earth is fantastic for visualization, it does not do (nor has it been intended to do) many traditional GIS tasks. As an example, you cannot really query GIS data or directly access attribute data. You also cannot edit or manage geospatial data. Google Earth is really intended to do one thing very well, and that is to display geospatial data on a visually appealing framework. There have been many efforts by a lot of people to try and wring GIS type capabilities out of Google Earth. Many of the more successful ones used a combination of network links and data embedded in the description tag (and visible in the callout balloon) to link points to other data available on servers. What would really make things easier would be if users could click on Google Earth and grab coordinates. If we could do this, then we could attach geospatial capabilities behind Google Earth to make it act as a GIS interface. The new Google Earth API (and a lot of trickery) have now made that possible. The first thing I wanted to do was to be able to create toolbars that could be accessible in Google Earth. Since I could not do that, I started looking into grabbing the Google Earth Windows handle so that I could embed the viewer in my application. I had a 75% solution in the bag when I stumbled on GoogleEarthAirlines. GoogleEarthAirlines is an ActiveX control written in Delphi that does just what I was planning to do. When I found this, I put my control on the backburner and started using this. The graphic below shows the GoogleEarthAirlines control in my application.


The plan now is to link GIS data with KML. KML will act as the layer file that does nothing more than render my GIS data. to get the GIS data into Google Earth, I used a modified form of Shape2Earth. Shape2Earth converts the shapefiles to KML, and then writes an XML file that links the two files together.


Shape2Earth is used to create height values of GIS Data

Basic colors for the output KML are selected


A Unique ID is selected from the Attribute field. This will be used to attach to databases through Google Earth

The steps above walk through loading a shapefile into the Google Earth GIS application. Now, we use our trickery to click on Google Earth and grab a coordinate. This is done using the method described here.

The great thing about this method is that it does not matter what the orientation of Google Earth is. It will always return the coordinate that you clicked.
In the graphic below, I have selected the ID button, and then clicked on a building. The application uses geoprocessing capabilities provided by the open source GIS application MapWindow. It loads the selected shapefile, and uses the coordinate to determine what has been selected. The result is the ability to directly access geospatial attribute data by clicking directly in Google Earth.


The same method can be used to select multiple features, as is shown below.


Select Tool lets the user drag a selection box across Google Earth

MapWindow components are used to select the geospatial features and display their attributes
Now that we can do some basic GIS type functions directly in Google Earth, we can start doing more sophisticated workflows. The next step is to actually create GIS data directly in Google Earth. That has already been done, and will be posted here shortly.


Thursday, January 04, 2007

Shape2Earth Version 1.0


After three beta testing periods, and a lot of new enhancements and optimizations, Shape2Earth Version 1.0 has been released for download at http://shape2earth.com/.

Shape2Earth uses freely available Geographic Information System (GIS) software to convert shapefiles into color coded Keyhole Markup Language (KML) files for visualization in Google Earth.

Shape2Earth provides a powerful tool for people and organizations who do not wish to invest thousands of dollars in professional GIS software in order to create powerful and compelling visual information. Shape2Earth can also quickly expand the capability of those who already have a significant investment in GIS for the lowest price possible.

Download Shape2Earth, and then look at the online blog to see what shape2earth can do for you.

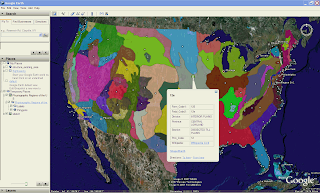
Physiographic Regions of the U.S.

Saturday, December 09, 2006

Labeling KML Part 2

I wrote previously on how Shape2Earth can now create center-points from polygons that can be used for labeling. The next thing I need to do is create the same functionality for lines. This is a bit trickier than for polygons. Imagine using the bounding envelope for the Missouri River to create a center-point to label the River. Its just not going to be in a very effective place.

The idea I am going to take a crack at is to use one of the points in the feature itself. I'll probably just pick the middle point and use that as the label. This should get the label reasonably close, and then let users make minor adjustments to its location in Google Earth.

Thursday, December 07, 2006

New Google Earth API Allows for GIS Type Interaction

I am not sure that this is what the Google Earth engineers had in mind when they released it, but new COM API exposes a method called “GetPointOnTerrainFromScreenCoords”.

If you pass this method normalized screen coordinates from the GE Render window, it will return the Latitude, Longitude, and elevation of that point in Google Earth. This opens up an enormous amount of potential for using Google Earth as your GIS interface.

Google has always maintained that they are not a GIS, and they are right. But they have a great visualization system. All that is needed is a way to interact with their interface in a way that makes sense for GIS types of applications. All of the GIS activity can than go on behind the scene.

As an example, I can now click anywhere on Google Earth and capture the coordinates. I can also drag a rectangle across the screen and define its actual location within GE. I can then pass this data back to GIS representation (such as a shapefile) of the loaded KML data. The result is a color coded selection set of data, or a new window that holds whatever feature data I would like to see from another server (or local data).

I can also use the coordinate to calculate a buffer that is loaded in as KML. I can also use this data to select other data.
You can also create very quick sketches directly in Google Earth that can be saved as shapefiles, or sent out to other clients for collaboration. Much more to come on this.

GIS for Google Earth: Final Testing

[Note: Final testing for Shape2Earth is complete. Shape2Earth Version 1.0 is has been released as shareware, and is available for download at http://shape2earth.com]

The final beta version of Shape2Earth is ready for testing. I am particularly interested in international users, as I have had some issues with coordinates being written without decimals, and I want to make sure that is working.

This version also has a licensing manager built in to it. It will operate in full mode for 7 days, but then must be licensed.

Beta testers will receive the license to extend the use of the software until the final release.

Any interested persons may contact me at Sabin21@gmail.com

Labeling GIS Data with Shape2Earth

One of the most requested functional additions for Shape2Earth has been the ability to label polygons. This is now possible with the use of a centroid function that creates a point in the middle of the polygon for the label.

In the example below, I will be labeling major lakes in the United States.

First, I open up Shape2Earth from MapWindow GIS


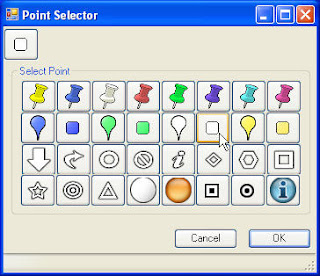
Then, from the Properties tab, I select the points that I want to use for the labels using the Enhanced Point Selector dialog box.


If I want there to be only text, I make the size of the icon zero, and do not add a label rollover. If I want to make it a bit fancier, I can select one point for the label, and another that is displayed when the user rolls over it.


Finally, I can select which attribute field I want to use to label each polygon. I can also select to sort the features so that they will be displayed in alphabetical order.


A simple result is show below.


These methods can be used to make some rather sophisticated views in Google Earth