An announcement from ESRI and Microsoft.
Users of ESRI’s ArcGIS will now be able to directly load base map data from the Microsoft Virtual Earth platform into the ArcGIS 9.3 Desktop and Explorer. Data layers will include the high resolution street maps, imagery, and hybrid that we have become accustom to seeing in Microsoft’s Virtual Earth.
Access to this data requires a subscription to ArcGIS Online Service.
Imagery can be previewed at http://resources.esri.com/arcgisonlineservices.
Wednesday, July 30, 2008
Virtual Earth ASP.NET Control
Using the Virtual Earth map in your web page is nothing new. What is new about this control is that you can drop it into your ASP.NET project in Visual Studio and get it running without the need for any client side JavaScript. All of the parameters can be set in Visual Studio and all of the code to manipulate and interact with the map and map data and can be written in server side .net code.
The Windows Live Dev Blog points out that the map can be made even more interactive through the use of ASP.NET AJAX.
This control is one of several that Microsoft is offering as part of their Live Tools for Microsoft Visual Studio.
The Windows Live Dev Blog points out that the map can be made even more interactive through the use of ASP.NET AJAX.
This control is one of several that Microsoft is offering as part of their Live Tools for Microsoft Visual Studio.
Wednesday, July 09, 2008
Shapefile to GeoRSS for Google Maps
The most recent version of Shape2Earth includes a functional prototype for converting shapefiles to a GeoRSS format. It currently works with simple lines and points. Attribute data can be selected to be embedded in the GeoRSS feed.
 Select the attributes you wish to export to GeoRSS
 Attributes can be embedded in the xml, listed as a table, or both
GeoRSS is a very popular format, and is particularly useful for serving data to web mapping applications such as Google Maps.
Attributes can be embedded in the xml, listed as a table, or both
GeoRSS is a very popular format, and is particularly useful for serving data to web mapping applications such as Google Maps.
View the Google Map/GeoRSS sample to see how point GIS data can be viewed.
 Select the attributes you wish to export to GeoRSS
  Attributes can be embedded in the xml, listed as a table, or both
View the Google Map/GeoRSS sample to see how point GIS data can be viewed.
Tuesday, June 24, 2008
Google Earth Custom Icon Editor
The Shape2Earth icon editor for creating KML files has been greatly enhanced recently. Users now have an interface that is very similar to the one they use in Google Earth, and the ability to add their own custom icons to point data.
 New icon selection window pulls icons from the Google Earth folder
 New icon selection window pulls icons from the Google Earth folder
 Custom icons can be added to the pallete
 Custom icons will stay in the icon window for later use
 Shape2Earth icons can be changed when the user 'hovers' over an icon in Google Earth
Friday, April 18, 2008
Leica TITAN
Leica Titan has actually been out for a while. There is a post on OgleEarth from December 2006 when the first product was just coming out. My first try with it was not so smooth. But recent updates have gone much better.
It appears to be your standard 3d earth browser, but is oriented more towards data sharing and collaboration. It has a built in instant messanger to share your spatial data with others.
It appears to be your standard 3d earth browser, but is oriented more towards data sharing and collaboration. It has a built in instant messanger to share your spatial data with others.

Leica Titan Globe

Search for a Place and zoom

Load a shapefile. It seems to be able to handle many different formats.

You can change feature colors (not based on attributes).
 Click on a loaded feature to view attributes
You can also load photos and place notes on the Earth to send to others. Performance was not to bad, though navigation was a bit touchy and took some getting used to. It seemed to me to be a bit like ArcGIS Explorer, but without the extensibility.
Leica TITAN is available for download.
Thursday, April 17, 2008
Google Earth Version 4.3 Released
Google Earth 4.3 was released on Wednesday, April 15. The biggest changes for most people (not power users of course) is a revamped navigation control and much different lighting on the planet.
The new lighting makes the Earth look much brighter, and the orientation of the light can be changed by moving the position of the Sun based on the time of day. This does not really make Google Earth better, it just makes it look different than in the past.
The new navigation control takes some getting used to, but it does let users move in ways that were not really possible before. There is more of a hover mode that makes is easier to move around when you are zoomed in close to an object, such as a model. This is a much bigger deal to me. Google Earth has always been good for navigating on a global scale, but needs some better controls for moving around a regional or smaller scale.
I had some problems with Google Earth locking up on me. I am staying with 4.2 until the next release, which typically cleans up a lot of issues.
Much better write ups on new functionality and a video can be seen at Google Earth Blog, and at Google LatLon , with some nice general thoughts at OgleEarth.
Monday, March 24, 2008
Open Source Geospatial Metadata Editor
One of the most important and often overlooked aspects of geospatial data is the associated metadata. In a nutshell, metadata is “data about data”. It provides the background information on the what, when, where, and how of a spatial dataset.
As an example, if you are going to be making decisions based on a spatial dataset, you need to know how accurate and/or precise the data is. Data may have been collected using high grade survey equipment, or it may have been digitized from the educated guess of a subject matter export. Both of these data may be useful, as long as the user knows about these accuracy issues.
ESRI provides two different metadata editors in ArcCatalog. One uses the FGDC metadata profile, and the other an ISO profile (both have some extra ESRI elements added).
The new release of MapWindow GIS (a freely available, open source GIS) has an excellent metadata extension that provides a number of metadata creation, management, and visualization tools.
The Editor can be launched from MapWindow, and can show metadata from a loaded shapefile, or from a metadata xml file loaded from the user interface. Metadata can also be viewed using a number of built in styles sheets.
The metadata editor seems to work very nicely. One change I would like to see would be the ability to store user contact information so that newly created metadata could be updated more easily.
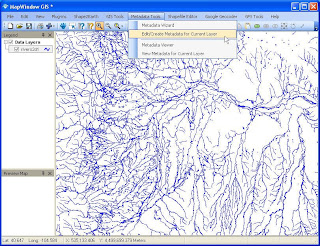 The Metadata Editor can be launched from MapWindow
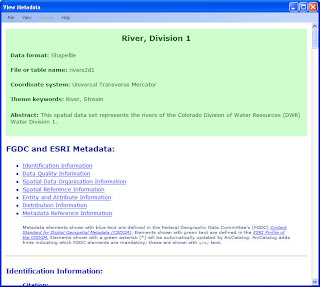 Metadata can be quickly viewed using a number of built in style-sheets.
As an example, if you are going to be making decisions based on a spatial dataset, you need to know how accurate and/or precise the data is. Data may have been collected using high grade survey equipment, or it may have been digitized from the educated guess of a subject matter export. Both of these data may be useful, as long as the user knows about these accuracy issues.
ESRI provides two different metadata editors in ArcCatalog. One uses the FGDC metadata profile, and the other an ISO profile (both have some extra ESRI elements added).
The new release of MapWindow GIS (a freely available, open source GIS) has an excellent metadata extension that provides a number of metadata creation, management, and visualization tools.
The Editor can be launched from MapWindow, and can show metadata from a loaded shapefile, or from a metadata xml file loaded from the user interface. Metadata can also be viewed using a number of built in styles sheets.
The metadata editor seems to work very nicely. One change I would like to see would be the ability to store user contact information so that newly created metadata could be updated more easily.
 The Metadata Editor can be launched from MapWindow
 A simple to use TreeView lets users navigate through metadata elements

I would like to see a change so that users can save contact profiles for quick loading.
Of course this is open source, so there is nothing stopping me!
 Metadata can be quickly viewed using a number of built in style-sheets.
MapWindow GIS 4.5 Release Candidate 2
The MapWindow Team released a second candidate for MapWindow GIS 4.5. The second candidate release was due to all of the new enhancements that are packaged with this version of MapWindow.
MapWindow is a Microsoft .NET based, extensible, open source, geographic information system (GIS) for the desktop. It has an active user community, and has been releasing new versions at a regular pace. It's plugin model allows developers to quickly create powerful, custom tools that can be streamlined for specific business purposes at a fraction of the cost when compared to more robust systems.
MapWindow is an excellent GIS package for those who want some basic GIS functionality. I find myself using MapWindow much more often than ArcMap for my day-to-day GIS work. It's just much quicker to start up and getting going with for my run of the mill GIS work.
The most recent 4.5 candidate offers a number of new plugins that are making MapWindow even better. Among them are:
These are in addition to a number of other plugin extensions that have already been made available.
And, of course, there is the Shape2Earth shareware plugin that converts GIS data to KML for viewing in Google Earth and Google Maps.
MapWindow is a Microsoft .NET based, extensible, open source, geographic information system (GIS) for the desktop. It has an active user community, and has been releasing new versions at a regular pace. It's plugin model allows developers to quickly create powerful, custom tools that can be streamlined for specific business purposes at a fraction of the cost when compared to more robust systems.
MapWindow is an excellent GIS package for those who want some basic GIS functionality. I find myself using MapWindow much more often than ArcMap for my day-to-day GIS work. It's just much quicker to start up and getting going with for my run of the mill GIS work.
The most recent 4.5 candidate offers a number of new plugins that are making MapWindow even better. Among them are:
- A Great Metadata creation, viewing, and editing tool.
- A GPS connection and tracking plugin.
- A connection to PostGIS data
- Google Geocoder Tool.
- Enhancements to the Shapefile Editor
These are in addition to a number of other plugin extensions that have already been made available.
And, of course, there is the Shape2Earth shareware plugin that converts GIS data to KML for viewing in Google Earth and Google Maps.
Monday, February 04, 2008
KML for Web Mapping
Keyhole Markup Language (KML) is starting to become a de facto standard for transmitting spatial data. Both Google Maps and Microsoft's Virtual Earth have added support for viewing KML data. In both of these cases, it is necessary to make the KML file available on the web so that Google and/or Microsoft can access the file and process it to be viewed in their map controls.
Google Map's, as you might imagine, is getting much better at displaying KML on their web map. The example below shows a KML file (created by Shape2Earth) showing the total number of households by state.
First in Google Map:
http://maps.google.com/maps?q=http://shape2earth.com/Documents/states_NumHouseholds.kml
Then in Virtual Earth.
http://maps.live.com/?mapurl=http://shape2earth.com/Documents/states_NumHouseholds.kml
Note how the geometries in Virtual Earth do not line up very well, and in some cases, are not visible at all. Virtual Earth also seems to automatically add a center point, and does not adhere to the KML coloring scheme. If you switch to 3D mode, the geometries will line up much better, but the fill color seems to be absent.
It looks like any investments that you might be making in KML converters are going to be beneficial for some time to come.
Tuesday, January 29, 2008
Create Your Own Google Earth Application
Building an application to work with Google Earth is pretty easy to do. This article will walk through the creation of a very simple application to capture different views in Google Earth.
To begin with, you will need to download Microsoft's Visual Studion Express Edition for C# (available for free at http://www.microsoft.com/express/vcsharp/).
Once Visual Studio is installed, select 'New Project' from the 'File' menu. In the New Project dialog box, select 'Windows Forms Application' and name your application 'FirstGeApp' (see below). Then select OK.

Once the new form is visible, right click on it and select 'Properties'. A properties window should appear in the lower right hand corner of Visual Studio. Change the following Form properties:
Name = frmViewCapture
Text = View Capture
TopMost = True
The TopMost property will keep your form on top of all other applications. This works well when interacting with Google Earth.

Once you have set the Form properties, we will add a MenuStrip control to the form, to do this, click on the Toolbox on the left side of the Visual Studio. When the tools appear, click on the pushpin icon to keep the tools open (see above).
After this, look for the 'MenuStrip' control and drag it onto your form.

Once the MenuStrip is on your Form, click on it to enter text. In the example below, I have added a 'File' menu and a "Capture View" menu. You can keep the default setting for both of these.

Next, we are going to add a TreeView control to store our captured views. Find TreeView from the Toobox pallete and drag it onto the form. Once you have done so, change the 'Dock' property of the TreeView to "Fill" (see bel0w). This will make the TreeView take up our whole Form.

Next, add an ImageList control. You can drag this control onto the Form, or drag it to the bottom part of Visual Studio (see below).

After you have added the ImageList, right click on and select 'Choose images' (see above). In the next dialog box, select "Add". Navigate to an icon of your choice (I used
C:\Program Files\Google\Google Earth\GoogleEarth.ico).

Once you have added the image, click on the TreeView in the form and look in the Properties on the right. Set the following properties:
ImageList = imageList1
ImageIndex = 0
Next, you will need to add a reference to Google Earth. To do so, look for 'References' in the Solution Explorer in the upper right hand panel of Visual Studio. Right click References and select "Add Reference". In the dialog box that comes up, select the 'Browse' tab. Browse to
C:\Program Files\Google\Google Earth\googleearth.dll (depending on your installation) and add it as a reference.
Next, click on Form1 in the Solution Explorer and select Code View (see below).

Now we are going to add some code. You will see code similar to below. Add the underlined code to project.
using System;
using System.Collections.Generic;
using System.ComponentModel;
using System.Data;
using System.Drawing;
using System.Linq;
using System.Text;
using System.Windows.Forms;
namespace FirstGeApp
{
public partial class frmViewCapture : Form
{
//Add a reference to the Google Earth Library
private EARTHLib.ApplicationGEClass _ge = new EARTHLib.ApplicationGEClass();
//Make an integer to keep track of our Google Earth Views
private int _viewNum = 0;
public frmViewCapture()
{
InitializeComponent();
}
}
}
Next, we will nee an event handler to capture the view. The simplest way to do this is to go back to your form and double-click "Capture View" on the menu that you added to your form. Visual Studio will automatically add the code below to handle the click event for this menu item.
private void captureViewToolStripMenuItem_Click(object sender, EventArgs e)
{
}
Next, we will add some code to actually handle this event. Write the following method underneath the captureViewToolStripMenuItem_Click method.
private void captureGeView()
{
//Get the current Google Earth Camera
EARTHLib.CameraInfoGE cam = _ge.GetCamera(1);
//Increment the number of views
_viewNum++;
//Create a Node for the tree view
TreeNode node = new TreeNode("View " + _viewNum.ToString());
//Add a reference the the GE Camera to the node
node.Tag = cam;
//Add the node to the tree view
this.treeView1.Nodes.Add(node);
}
Now, add "captureGeView();" to the captureViewToolStripMenuItem_Click method.
The next step is to add code to actually move Google Earth to each of the capture views. Go back to the Form and click on the TreeView control (treeView1). On top of the properties box, you will see an icon that looks like a bolt of lightening. Select this to see events for the TreeView. Double Click on MouseDown to automatically add a handler (see below).

This will add a "treeView1MouseDown" method to your code. Add the following code in this method.
private void treeView1_MouseDown(object sender, MouseEventArgs e)
{
//Get the clicked node
TreeNode node = this.treeView1.GetNodeAt(new Point(e.X, e.Y));
if (node != null)
{
//Get the cam from the tree view tag reference
EARTHLib.CameraInfoGE camera = (EARTHLib.CameraInfoGE)node.Tag;
//Move the GE View
moveGE(camera);
}
}
And the following
private void moveGE(EARTHLib.CameraInfoGE cam)
{
//Set the Google Earth Camera View
_ge.SetCamera(cam, .5); //Change this number to alter your speed
}
Now Press F5 on your keyboard to run. Google Earth will open with your application. Clicking "Capture View" will add a view to your Tree View. Clicking on a node on your TreeView will move you to that node
 Can you name this stadium?
You can take this much farther by adding user input to name each view and alter the speed. Chain them together to creat a tour or export to KML.
Monday, January 28, 2008
Build Your Own Google Earth Control
If anyone is interested in writing your own Google Earth Control that can be embedded in your applicaiton, there is good information on how to do so using C# at Google Groups for KML.
Also, you can see delphi code to do the same thing at googleearthairlines.
Also, you can see delphi code to do the same thing at googleearthairlines.
Monday, January 21, 2008
Create a Google Earth Toolbar / Form
A third option for integrating customized tools with Google Earth is pretty simple, you just write an application that hovers over Google Earth. It just like a floating tool bar or form that you can use to access your custom applications.
In the sample below, the application is sized to look like an extension to the Google Earth toolbar. It keeps track of the location of Google Earth so that it can stay in the same location. Different applications that interact with Google Earth can be launched from this toolbar.
Notice below the extension to the Google Earth Toolbar.
As an example, a custom Spatial Bookmark tool can save the current view of Google Earth for quick reference. Notice below how when this button is clicked on, a drop down menu of options is presented.
After selecting 'Create', a Windows form is launched. This form lets users name the current bookmark and set the zoom-to speed for when it selected.
In addition to saving bookmarks, the view itself can be sent through a web service to other people participating in a shared Google Earth collaboration.
In the sample below, the application is sized to look like an extension to the Google Earth toolbar. It keeps track of the location of Google Earth so that it can stay in the same location. Different applications that interact with Google Earth can be launched from this toolbar.
Notice below the extension to the Google Earth Toolbar.

As an example, a custom Spatial Bookmark tool can save the current view of Google Earth for quick reference. Notice below how when this button is clicked on, a drop down menu of options is presented.

After selecting 'Create', a Windows form is launched. This form lets users name the current bookmark and set the zoom-to speed for when it selected.

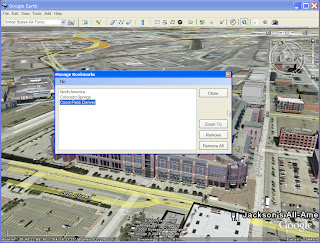
Any of a number of spatial bookmarks can be save and accessed from the drop-down menu (see below).
The bookmark data itself is saved locally as an XML document. Different XML spatial bookmark documents can be saved and managed (see below).

In addition to saving bookmarks, the view itself can be sent through a web service to other people participating in a shared Google Earth collaboration.
Embed Google Earth Into Your Application
This method for customizing the Google Earth Interface, embedding the Google Earth render window (the actual map window) into your own applications, was apparently pioneered Luca Rocchi and his Google Earth Airlines application. Luca figured out that you could grab the GE map window using its Windows handle to place it into your own application. He has used this to plop GE into web applications, but the ActiveX control that he provides for free can also be used in any COM compliant language (such as VB.Net or C#). I have used this plugin (and a similar one of my own design) to access external applications from Google Earth.
This method lets you completely encapsulate Google Earth with your own tools. However, it also hides the Google Earth tools. To get around this, you can assign the entire Google Earth application to be a child to your own custom application. Interestingly, not too long after Luca released his 'Google Earth Airlines' plugin, Google provided a method in their API to directly access the Windows Handle of both the render window (actual map) and the application window (the full application).
This method lets you completely encapsulate Google Earth with your own tools. However, it also hides the Google Earth tools. To get around this, you can assign the entire Google Earth application to be a child to your own custom application. Interestingly, not too long after Luca released his 'Google Earth Airlines' plugin, Google provided a method in their API to directly access the Windows Handle of both the render window (actual map) and the application window (the full application).
Custom Google Earth Applications with Network Links
As posted previously, there are five general ways in which to provide custom control to Google Earth.
To use it, you need to have a web server that can respond to a network link request from Google Earth. The request can have a number of client parameters in it, such as the view information. This can be used to generate a return KML document whose content is based on the area that a user is looking at. A network link KML file can be added to Google Earth that sends this request to update the KML document on a time basis, or whenever the user zooms and stops.
This method can get pretty sophisticated. The Regions KML tag allows users to define the visual region of interest for specified data in the KML document. This is a great way to handle very large datasets.
A network-link KML document can be created that defines a number of different, thematic, KML documents, which can be loaded and unloaded every time the user enters a defined region. Brian Flood offers an excellent example of how this can be applied to large geospatial data sets using Arc2Earth.
- Use built-in network links and server side scripting to serve custom data dynamically.
- Embed the Google Earth render window into your own application.
- Build customized applications that always hover over Google Earth.
- Use JavaScript in the built in web browser.
- Use a Flash application in a pop-up balloon.
To use it, you need to have a web server that can respond to a network link request from Google Earth. The request can have a number of client parameters in it, such as the view information. This can be used to generate a return KML document whose content is based on the area that a user is looking at. A network link KML file can be added to Google Earth that sends this request to update the KML document on a time basis, or whenever the user zooms and stops.
This method can get pretty sophisticated. The Regions KML tag allows users to define the visual region of interest for specified data in the KML document. This is a great way to handle very large datasets.
A network-link KML document can be created that defines a number of different, thematic, KML documents, which can be loaded and unloaded every time the user enters a defined region. Brian Flood offers an excellent example of how this can be applied to large geospatial data sets using Arc2Earth.
Customizing the Google Earth Interface
Ever since people became aware that it was possible to allow external software applications to interact with Google Earth using their API (which seems to be in perpetual beta stage), they have been trying to figure out how best to integrate their custom applications into Google Earth.
While almost all of the initial efforts dealt with taking existing applications and simply loading their data into GE in a KML format, later efforts involved trying to make all functionality directly accessible form the Google Earth application itself.
The basic problem, however, is that Google Earth does not provide a framework to extend its user interface. You cannot simply add a new button to their toolbar that fires off your own application, as you can in many GIS and Office software packages.
A couple of tricks have been developed to make Google Earth application extensions appear to work seamlessly with Google Earth. They generally fall into five categories.
- Use built-in network links and server side scripting to serve custom data dynamically.
- Embed the Google Earth render window into your own application.
- Build customized applications that always hover over Google Earth.
- Use JavaScript in the built in web browser.
- Use a Flash application in a pop-up balloon.
Has anyone come up with their own way get their application to work with Google Earth?
Thursday, January 10, 2008
Publish Your Own Google Map Without a Server
If you would like to publish your own Google Map, but do not have a server to place it on, there are some greate options to get you started without needing a server.
I ran across this web page recently that has a number of excellent tutorials for using Google's Page Creator. The Google Pages site is fantastic for putting together really quick and easy web pages. It also will let's you publish your own Google Maps Web Page using the this tutorial.
I used this tutorial to put together my own sample Google Map. This is pretty basic, but could be spiced up quite a bit with added funtionality.
Saturday, January 05, 2008
Creating Hybrid Spatial Solutions: Commercial and Open Source
Open source geospatial systems and tools have really taken off in recent years, as has the open source community at large. While an open source geospatial solution may be enticing to some GIS managers, there remain a number of hurdles for them to be effectively employed.
Chief among these hurdles are the lack of documentation, training, and the added difficulties of configuring or extending open source solutions (it’s tough to get a good ArcSDE administrator, it’s tougher still to get a good PostGIS administrator). In addition to this, while open source is starting to provide a rather comprehensive suite of software that includes desktop and web based GIS tools and services, as well as database storage and support, they still tend to lack a good data management framework. I suspect that the reason for this is because developers of open source spatial software want their work to be able to do something relatively fast. So they tend to make them work on existing GIS data (such as shapefiles) rather then put a heavy emphasis on creating and managing spatial data from scratch.
Most GIS may be reluctant to move too quickly towards an open source solution when they already have a functionally proprietary system in place. Even though moving towards open source may be compelling due to the potential cost savings in licensing fees, those savings are offset by concerns over being able to manage the system and maintain current capabilities.
The most likely scenario in the near future is to start seeing the appearance of hybrid solutions.
As an example, a GIS shop may decide that their use of ArcEditor (or ArcInfo), ArcSDE and ArcIMS (or ArcServer) may be overkill for their specific requirements. While this software provides an enormous amount of capability, this may not actually be required. It may be possible for them to effectively manage their spatial data using an ArcMap license to manage the spatial data, and then have that data pushed into a PostGIS database for corporate or enterprise attribute editing and visualization. The key is to leverage the power of both commercial and open source solutions towards cheaper and oftentimes more powerful solution.
Subscribe to:
Posts (Atom)