One of the things that I have been working on lately (or .. whenever I get the chance) is a Shapefile to KML writer for viewing GIS data in Google Earth that uses open source GIS components. I gained a lot of experience with KML while prototyping an ESRI ArcMap based toolset that used ArcObjects, and thought that an open source equivalent would be worth pursuing.
There were three main reasons that I decided to work on this project. 1) It sounded like a lot of fun, 2) I have been increasingly interested in open source GIS, and 3) the emergence of Google Earth (as well as Google Maps, Yahoo Maps, and Microsoft Live Local) has led to an enormous interest in geospatial visualization outside of the traditional GIS community. There is a massive amount of GIS data available to the public in the form of shapefiles, and a cheap, license free, toolset to get the data into Google Earth might be useful to a lot of people. I also really like the idea of having my own, royalty free, toolset for creating Google Earth based applications.
There are several good open source GIS packages available today, and while none of them come close to matching a professional GIS, quite a few of them are powerful enough to be useful. My personal favorites are OpenJUMP, Quantum GIS (QGIS), and MapWindow GIS. As you might expect, each of these has their strong and weak points. In fact, I have found that if you are willing to jump back and forth between each of them, you can do an enormous amount of serious GIS work.
To develop my Shapefile to KML tool, I decided to use MapWindow GIS. The main reason for choosing this open source GIS was it’s development environment (.NET), the ease with which it was possible to create plugins, and its re-projecting capability (very important if you want to get all of your shapefiles into Google Earths projection system). MapWindow GIS also lets users make shapefiles from scratch pretty quickly, though its editing tools are not as robust as OpenJump or QGIS (which I have often used for editing shapefiles to be converted in MapWindow GIS).
To get an idea of the status of this open source KML initiative (I will certainly have to come up with a better name than that), I thought I would walk through a typical scenario of taking a shapefile off of the internet and placing it in Google Earth.
I’ll start at a web page for accessing GIS data for Austin, Texas (and the regional area) and downloading a shapefile representing School Districts. This shapefile has no projection information, but MapWindow GIS allows us to assign a projection to the shapefile.
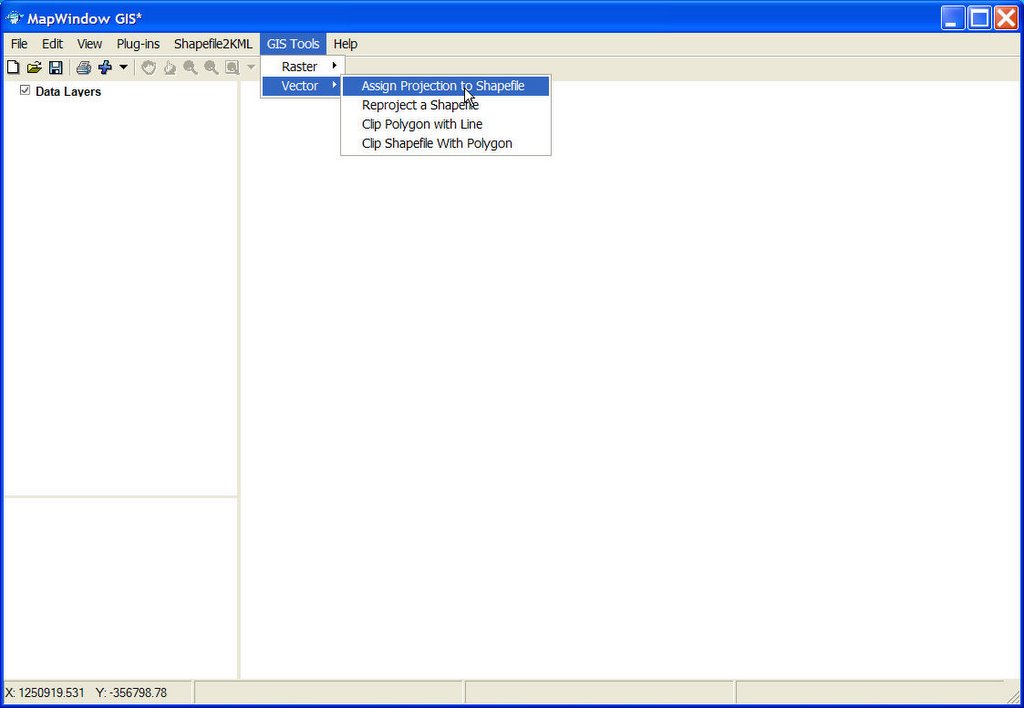
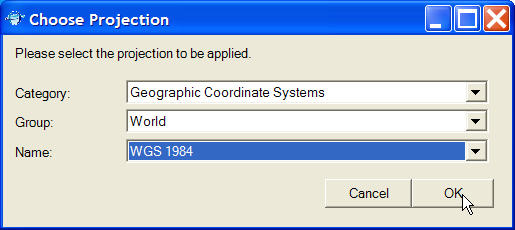
In this case, the web site points out that “All data sets are projected into the Texas State Plane Central NAD 83 survey feet coordinate system unless otherwise stated.” So we enter this in the “Choose Projection” form in MapWindow GIS.

We have one more step to go, however, as Google Earth has its own projection System. Now that the shapefile knows what its projection system is, it can convert to WGS84 to be compatible with Google Earth using MapWindow GIS’s “Reproject a Shapefile” tool.
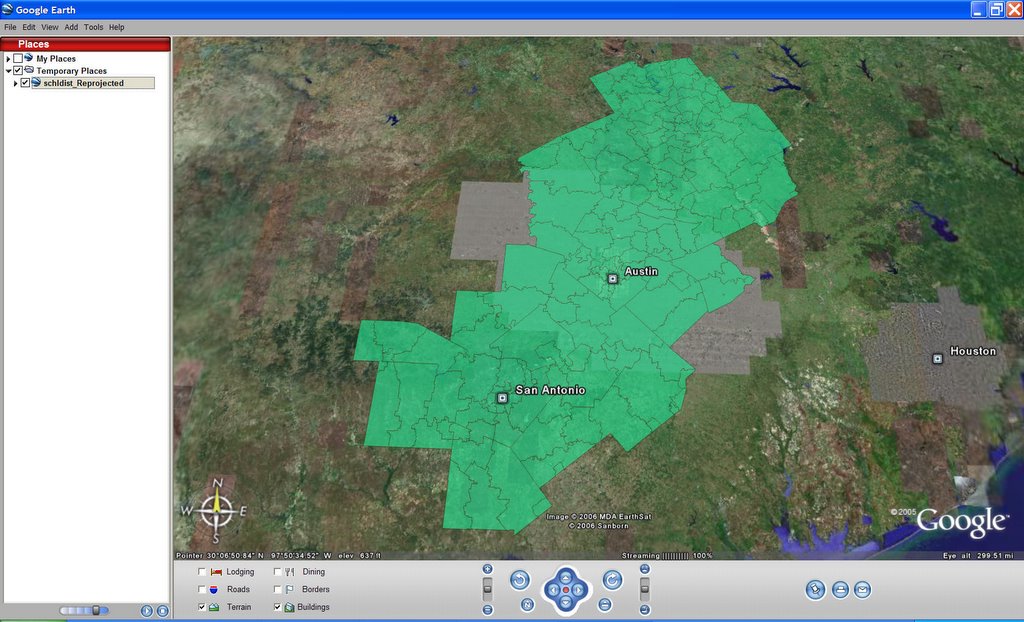
The way that MapWindow GIS handles re-projecting data is to create a new shapefile and write it to the same directory as the shapefile that is being re-projected. The new shapefile has the same name with “_Reprojected” tacked on the end (so, in this case, the school district shapefile I downloaded named “schldist” is re-projected to a new shapefile named “schldist_Reprojected”).
Now that my data is in the proper projection, I can go ahead and add it to Google Earth using MapWindow GIS.

Once the data is in MapWindow GIS, I can make whatever symbolic changes I might want by accessing the layer properties. MapWindow GIS offers the basic coloring schemes that you would find in a typical GIS, such as coloring features by attribute. Once I find a color I am happy with, I can access the Shapefile2KML tool from the menu bar.
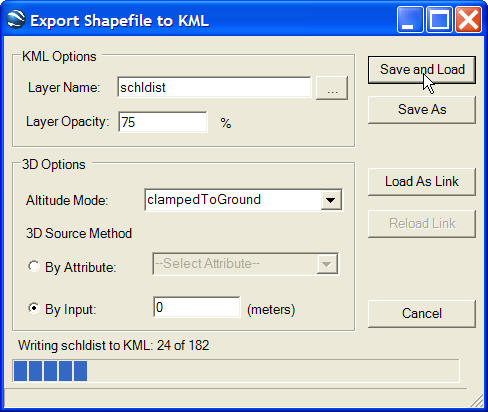
At this point in development, I have some pretty basic KML parameter options I can set. The Layer Name is the name that is visible in the table of contents in Google Earth, and the Layer Opacity determines to what degree you can see through the layer. There are currently two ways to determine a height value for each feature. Either a common number can be set that is applied to all features, or a numeric attibute field can be used. The color for each feature is determined by the symbology used in MapWindow GIS.
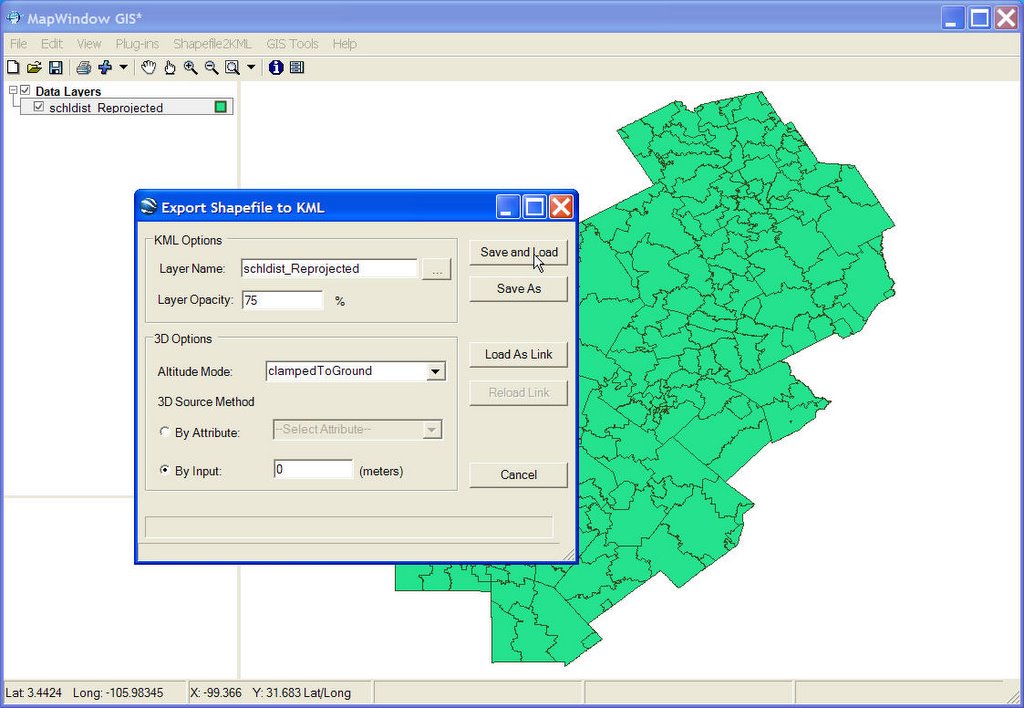
Once the parameters have been set, I can convert the data to KML. I have a couple of options here as well. I can simply save the KML to the hard drive, or I can save it and have it be automatically loaded into Google Earth. If I want to play around with the data a bit to see how it looks in Google Earth, I can select "Load As Link". This writes and loads a Network Link into Google Earth that references, and therefore, loads the data KML file that was saved on your hard drive. The interesting thing about using this method is that opening a Network Link in Google Earth has a different behaviour than opening a regular KML file. This requires a brief explanation.
If you were to write a function that loads a KML file, and hit it 10 times, it would load that same file 10 time. If you do the same thing with a Network Link, however, it will not load that same file 10 times. Each time you hit the button, the Network Link is reloaded. That means that if you rewrite the Network Link to point to a different KML file before loading it, you would remove the KML data that is currently visible in Google Earth, and replace it with the new KML data.
What this means to us in this case, is that we can keep modifying our shapefile symbology in MapWindow GIS and keep reloading it in Google Earth by selecting the "Reload Link" button. I have found this to be quite handy, and will describe its functionality more later on.
For our demonstration here, I select the "Save and Load" button. After the KML file is written, a dialog box opens to ask me where it should be saved. After I select a location on my hard drive, the KML file is save and then automatically loaded into Google Earth.
 This is neat for data that already exists, but I wanted to also take advantage of the creation and editing ability of MapWindow GIS (and other open source GIS systems as well). One way to do this is to find available imagery to digitize off of. I plan to look into using the web service offered by Microsofts TerraServer, but for my initial personal use, I used Google Earth's API to capture their view and write a world file to georeference it for use in GIS.
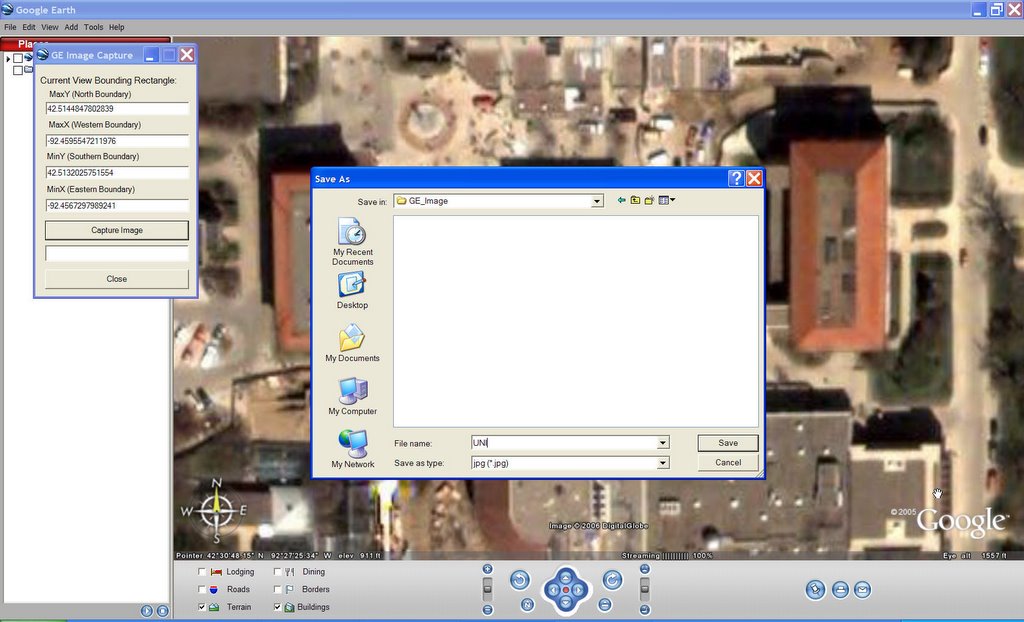
Currently, I can select "Get Image from GE" from MapWindow GIS (or access a stand-alone version from my desktop) which opens a simple dialog box. I can then zoom into the scene I want in Google Earth and select "Capture View" from the form. If the scenes tilt and orentiation to north are not correct for GIS, I am alerted that the scene needs to change to meet these criteria (which are required for proper alignment in GIS). If I select OK, the scene is automatically moved to zero tilt and zero degrees to north. Selecting "Capture View" again lets me save the view to my hard drive in the form of a jpeg file. Here, I have zoomed into the campus of the University of Northern Iowa and captured my view.
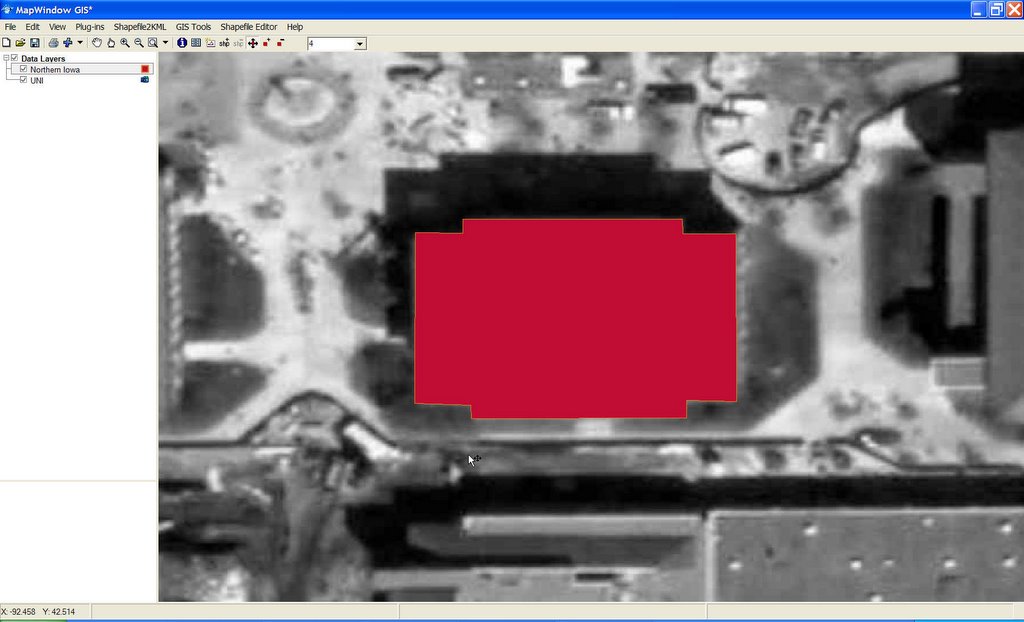
 While the resolution of this image is not fantastic, it allows me to do some general sketching using the image as a background reference.
I can load the image into MapWindow GIS, create a brand new shapefile (in this case, a polygon), and start digitizing new polygon features on top of the image. Below, I have traced the outline of one of the buildings on the UNI campus.
I can also load the imagery into other GIS packages for editing. After saving my edited shapefile in MapWindow GIS, I have loaded the image and shapefile into QGIS (below). Once in QGIS, I added another feature and saved my edits.

After I am finished editing my new shapefile, I loaded it back into MapWindow GIS to convert it into KML. Below, I have set the color of the features to silver, set my KML parameters, and then click "Load As Link".
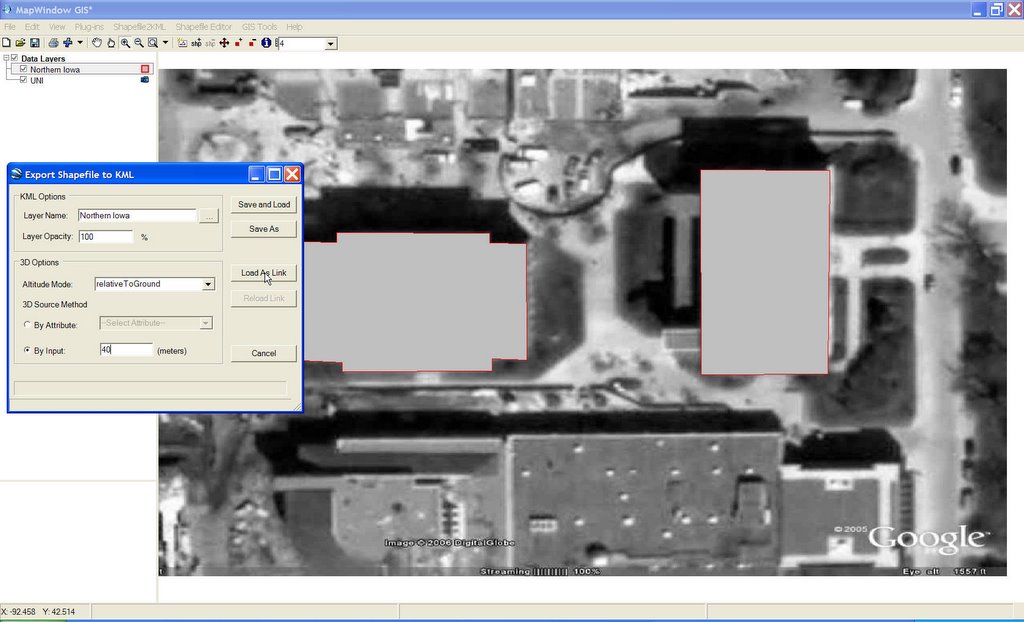
After the data KML is written, I am prompted to save the file to my hard drive. But because I used the "Load As Link" tool, a second file (the Network Link) is also saved. The Network Link KML has the same name as the data KML file with a "_link" added to it. This is the KML file that is actually loaded in Google Earth as soon as I save the file. When the Network Link is loaded into Google Earth, it automatically loads the data KML file that it references.
 The interesting thing about this (as described above) is that I can rapidly make modifications to the shapefile and quickly re-load it into Google Earth. The graphics below demonstrate this. I can change the color and KML values, and simply hit "Reload Link" to replace the data into Google Earth

This is just a quick view on the current status of my open source GIS / Google Earth project. Later, I'll describe some additional feature I plan to implement.
No firm decision has been made on the method of release. I had first considered a nominal fee (it would be much less than Google Earth Pro with the GIS module). This is dependant on how well the final version works, as well as how much time I will need to put into it.
ReplyDeleteI will be very interested in talking to people willing to beta test and provide feedback.
Tim
Tim,
ReplyDeleteI am a Geomatics Engineer with GIS experience. I think your product is quite interesting. I think Google Earth is going to really change my industry and that this would be a great tool. I would like to be kept updated on its progress and would be happy to provide feedback.
Dear Sir,
ReplyDeletei have been trying to import shapefiles according to your description. Shapefiles are correctly displayed in MapWindow GIS, reprojection works, but finally the converted KML file opens in GE, but displays infinite and wrong lines... the coordinates are not shown in the placemarks. This is the same problem for lines and points.
do you have any idea what went wrong? the orginal file used WGS84 so i am a little at loss...
I used shapefiles from http://www.aims.org.af/home/ssroots.asp?seckeyz=z2&secido=2&seckeyt=a10&seckeyth=b206
Settlements (Point) and Road (Polyline)
the file has the following information (WGS84):
Spatial_Data_Organization_Information:
Direct_Spatial_Reference_Method: Polyline
Point_and_Vector_Object_Information:
SDTS_Terms_Description:
SDTS_Point_and_Vector_Object_Type: Polyline
Point_and_Vector_Object_Count: 6543
Raster_Object_Information:
Raster_Object_Type: None
Spatial_Reference_Information:
Horizontal_Coordinate_System_Definition:
Geographic:
Latitude_Resolution: 0.000000
Longitude_Resolution: 0.000000
Geographic_Coordinate_Units: Decimal Degrees
Geodetic_Model:
Horizontal_Datum_Name: WGS84
Entity_and_Attribute_Information:
Detailed_Description:
Entity_Type:
Entity_Type_Label: roads-all.shp
Many thanks for any helpful comment,
Joerg Yoder
I tried the same shapefiles and they seemed to work fine.
ReplyDeleteI believe the problem might have to do with the language settings of your computer. The current beta does not ensure that decimal points are used for coordinates (instead of commas), and Google Earth cannot read coordinates without them.
An example would be:
-104.5555,39.4444,0
being written as:
-104,5555,39,4444,0
Google Earth will want to parse everything with a comma.
This problem is fixed in Beta 3 (not released yet)
If this is in fact the problems, I apologize for the inconvenience.
pleas tim I would like to try the beta version of this tool it is really cool
ReplyDeleteInteresting work. Thanks for sharing.
ReplyDeleteRegards
digitization services
Thanls
ReplyDeleteIf you want to convert a shapefile to KML, one of the easiest tools that I have found is on Geocommons.com
ReplyDeleteYou have to create a free account but then you can upload your data and convert it to KML. Very easy to use and, since it is web based, you can convert the data from your Mac. This is a BIG help since many of the other conversion tools are Windows based only.
Hope this helps someone out there!
Thank you, this was a great help!
ReplyDelete